Photos seem like an easy starting point for landscape painting and the advent of consumer digital cameras has made photography more accessible than it’s ever been before.
Photographs serve as convenient reference material that allows us to paint when we simply can’t – or don’t want to – get outside. They are also a handy way to produce a lot of paintings from a trip away.
But photography is not without its problems.
We have a much greater range of tone and colour perception than film or digital cameras do and when we view a landscape, our eyes are constantly adjusting to account for light and dark areas. As a result, photos can rarely match what we see in real life.
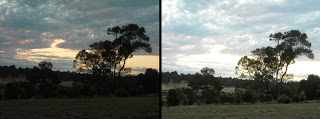
To understand one of the biggest problems of relying on photos as a basis for painting, take a look at these two photos…
This scene was quite dramatic to look at but neither photo captures it as I saw it.
When I took the photo on the left, I exposed it for the sky. This makes all the dark areas in the land mass much darker than I perceived them. The photo on the right was exposed by first pointing the camera toward the tree line then pressing the shutter button half-way before recomposing and taking the photo. This opens up the aperture (or the digital equivalent) and gives me detail in the darker areas but blows out the bright areas in the sky. It’s almost impossible (for me anyway) to successfully expose both areas in one photo to appear the same way we perceive it with our eyes.
Knowing this happens, I often take several photos, exposing each one differently so I’ll have reference material for all areas if I decide to paint from photos.
Although it lacks some of the luminosity I experienced, the left-hand photo does a pretty good job with the clouds and sky colours. The right-hand photo captures some of the depth and detail in the land and tree masses but the sky would be virtually useless as a painting reference unless you have a great memory or are happy to invent colours to give it some life. A lot of photos like these probably never get turned into paintings and we might find ourselves wondering why we even took them (I’ve got boxes full of such photos from the days of film).
If I painted this scene en plein air, the finished painting would combine elements of both photos and would also likely include more warm-cool contrasts and aerial perspective. Getting the same result from “average” photos takes experience, guesswork, luck or imagination.
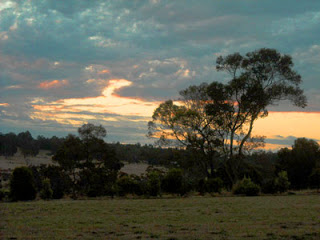
If you have access to photo editing software and know what you’re doing, it’s possible to adjust some “average” photos to more-closely match the scene as you saw it with your eyes.
This is the left-hand photo from above but I’ve used a curve in Photoshop to pull some weight out of the darkest areas whilst leaving the light and mid tones virtually unchanged. Then I adjusted the saturation a little to push a bit more life into the colours, especially the warm highlights in the sky. It still falls short of the scene as I remember it, but it could form the basis of a painting.
If you love doing representational art – where the things you paint are actually recognisable – then the next time someone says “why don’t you just take a photo instead?”, you can explain how a painting is so much more personal and how a good painting is vastly superior to the average photo. In the meantime, getting out and studying how light truly effects what we see, even taking notes, will make your photo-based paintings more successful.


